Crochet Russian Knot
Crochet Russian Knot - Best of all, it creates a secure join, so you can keep crocheting or knitting without worrying about yarn ends! Here are instructions on how to complete the russian join in 7 easy steps. It’s great for yarn that can take a little pulling. In your life as a crocheter, sometimes you’ll have a big project and need to add a second (or eighteenth) ball of yarn. 507k views 7 years ago crochet basics. Invisibly join new yarn with no extra ends! For more information on the tutorial and patterns, includin. It’s also very secure so you don’t need to worry about anything working it’s way out and unravelling. You can use it in the middle of a project to join in new yarn without weaving in ends later, or you can use it to organize your smaller bits of stash yarn to create a “magic yarn ball.” Web the russian join is an excellent technique for attaching a new skein of yarn or for changing colors. Web skip weaving in ends and stop relying knots with this super easy, beginner friendly method of joining yarn together! At the end, you won’t have knots or ends to weave in! Web learn how to tie the magic (or russian) knot with this photo and video tutorial for crocheters. Web there is a method of joining yarn together that actually doesn’t leave ends, doesn’t involve knots in your work and is fairly easy to do! The russian join also works well when you are making your own yarn cakes with a yarn ball winder. The russian join and the seamless knot. Web the russian join is a great way to connect two ends of yarn so that the join is as seamless as possible in your next project. When done correctly, (practice, practice, practice!) this knot will hold for the life of the item and you can cut off the tails right at the knot! It is faster than the russian join and leaves no tails to weave in from the change. It’s not for precise changes in color. Talk about simplifying your scrap busters! Here are instructions on how to complete the russian join in 7 easy steps. Because of these and other benefits, it’s my very favorite joining method and it’s called the russian join. It’s great for yarn that can take a little pulling. Web today i’m going to teach you how to make the russian. The russian join also works well when you are making your own yarn cakes with a yarn ball winder. Web today i’m going to teach you how to make the russian join for knitting and crochet. At the end, you won’t have knots or ends to weave in! It’s secure and it’s another way to avoid having to weave in. Web in this video you will learn how to crochet the russian join! Talk about simplifying your scrap busters! Eliminate yarn tails and weaving in with this method! Learn to join your yarn using this time tested method, a. It is faster than the russian join and leaves no tails to weave in from the change. Web in this video you will learn how to crochet the russian join! The russian join is one of the most secure ways to attach a new skein of. No knots or weaving in ends. Web attach new yarn or change colors seamlessly by following this russian join tutorial on bluprint. ♥ watch the magic knot tutorial: One of many tips and tricks i have! It’s great for yarn that can take a little pulling. At the end, you won’t have knots or ends to weave in! When you use the russian join, you do work some stitches with double the thickness of yarn. Web the magic knot is a great skill to have in your tool. Talk about simplifying your scrap busters! Web i recently came across this video explaining the “magic knot”, which is a double knot used to join yarn. 507k views 7 years ago crochet basics. In your life as a crocheter, sometimes you’ll have a big project and need to add a second (or eighteenth) ball of yarn. For more information on. Tutorial includes both pictures and video. Web skip weaving in ends and stop relying knots with this super easy, beginner friendly method of joining yarn together! It is faster than the russian join and leaves no tails to weave in from the change. Web the magic knot is a great skill to have in your tool box. It’s not for. Here are instructions on how to complete the russian join in 7 easy steps. Web the russian join is a way of adding a new ball of yarn without knots, or ends to sew in. Web the russian join allows you to add yarn to the working strand without tying a knot and without leaving ends to weave in later!. The russian join also works well when you are making your own yarn cakes with a yarn ball winder. ♥ watch the magic knot tutorial: Some things to consider about the magic knot: The russian join and the seamless knot. Eliminate yarn tails and weaving in with this method! Web the russian join is a way of adding a new ball of yarn without knots, or ends to sew in. It’s great for yarn that can take a little pulling. Tutorial includes both pictures and video. Web in this video you will learn how to crochet the russian join! Web today i’m going to teach you how to make. Web learn how to do the russian join for your next crochet or knitting project with crochet instructor melanie ham. 507k views 7 years ago crochet basics. For more information on the tutorial and patterns, includin. When you use the russian join, you do work some stitches with double the thickness of yarn. Some things to consider about the magic knot: It’s secure and it’s another way to avoid having to weave in ends. Eliminate yarn tails and weaving in with this method! ♥ watch the magic knot tutorial: It’s not for precise changes in color. With the magic knot technique there are no tails left to weave in, the knot is not visible and there is no added bulk. It is faster than the russian join and leaves no tails to weave in from the change. Best of all, it creates a secure join, so you can keep crocheting or knitting without worrying about yarn ends! Web the russian join is a great way to connect two ends of yarn so that the join is as seamless as possible in your next project. Web today i’m going to teach you how to make the russian join for knitting and crochet. In your life as a crocheter, sometimes you’ll have a big project and need to add a second (or eighteenth) ball of yarn. Web the russian join allows you to add yarn to the working strand without tying a knot and without leaving ends to weave in later!
Russian crochet pattern charts and schemes crochetknitting e Etsy
Russian Crochet Pattern EBook issue with schemes in RUSSIAN Etsy

laura's frayed knot crocheted leaf

3 ways to connect Crochet Classic / Magic Knot / Russian Magic
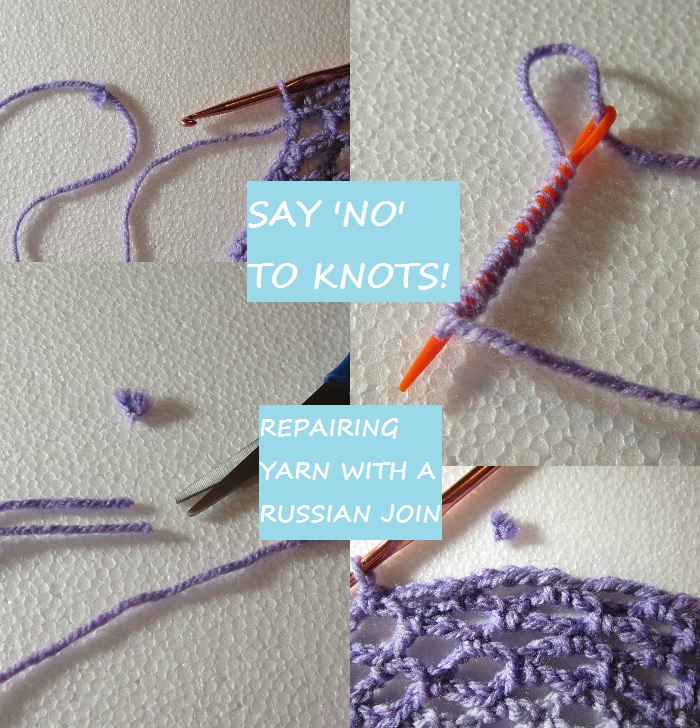
Say No to Knots

The Russian Join Technique / Crochet Crochet Pinterest Joining

How to Use Russian Joins in Your Crochet and Knitting Banana Moon

Russian Join Yarn Without Knots or Ends a Tutorial from B.Hooked Knit

😊 The Russian Knot How To Tie Yarn Without A Knot 😊 Crochet

Learn to use a Russian join in your crochet or knitting! in 2021
Web The Russian Join Is An Excellent Technique For Attaching A New Skein Of Yarn Or For Changing Colors.
When Done Correctly, (Practice, Practice, Practice!) This Knot Will Hold For The Life Of The Item And You Can Cut Off The Tails Right At The Knot!
Tutorial Includes Both Pictures And Video.
At The End, You Won’t Have Knots Or Ends To Weave In!
Related Post: